Airdrop alternative iOS–>Windows

Something that’s been on that bothersome to-do list in the back of my mind is to find a way to “airdrop” photos & videos from iOS devices to my Windows devices. Yesterday I spent some time to check out options. Looks like there are a few cool and easy ways to do it. Thought I would take a few minutes to share.

The main reason I want this solution is to simplify my daily routine of getting photos and video clips of student learning onto my workplace Windows laptop. I then spend a few minutes each day making posts to FreshGrade. It’s cumbersome to keep usb cables around for this job, and really, surely it can be done wirelessly? At work, it might be from my personal iPhone or a classroom iPad. I occasionally do the same task at home, onto either my work Windows 10 laptop, or my personal Windows 10 laptop. I have student data privacy laws (B.C. and Canada) in mind, so if possible I am looking to avoid cloud based solutions. I just want photos and videos to transfer wirelessly directly from one device to another. Just like airdrop from one iOS device to another.

Here are some of the solutions I looked at:

Instashare Snapdrop FonePaw
SHAREit Xender Zapya

I read some reviews and learned about how the technologies work. The general idea is that these apps make use of peer to peer wifi connections. They require the iOS device and the laptop to be on the same wifi network. The iOS apps and the Windows 10 software talk to each other across the device’s wifi hardware, without sending files into the cloud / internet. I think they use the local wifi network to set up the connection, and then peer-to-peer wifi is used. Clearly I’m not an expert but that’s my layman understanding. Some solutions need a program to be installed and run on the Windows device (e.g. Instashare). Others run through a browser like Chrome or Firefox on the Windows device. Some solutions require the Windows device to perform a “QR code scan” to set up the Windows-iOS connection. Some solutions are faster than others. Some of these solutions are free, some are paid at a reasonable price, and some are paid at a cost I consider unnecessary for a classroom teacher. I didn’t test all the above solutions. From the reviews of others and knowing what I wanted, I decided to install and try out Instashare and Xender.

What I value highly are:
1. free or affordable
2. fast
3. easy

Xender was the one I liked the best, as I was able to set it up to look a lot like airdrop. Instashare actually looked more like airdrop and has the advantage of tighter iOS integration, with its app available as an option when you “share” from apps. But it lacked on the speed side…. just not fast enough for a number of photos or videos.  Xender has an easy to understand setup and use, plus it’s very fast. It’s also free, where Instashare is paid on the Windows side.

Here are the steps for the Xender solution.

One-time setup:
1. Install Xender app on iOS device
2. On Windows 10 device in your browser (e.g. Firefox), make a bookmark for “Xender” :  http://web.xender.com

To transfer photos iOS device to Windows device:
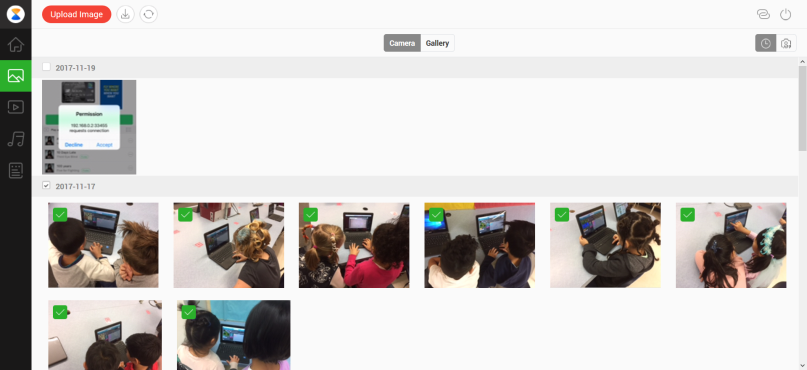
1. In Firefox, launch Xender bookmark … a QR Code will pop up on the screen
2. Launch Xender app on iOS device; tap connect, computer, scan
Point your iOS device to scan the QR code. It’s super fast and amazingly good.
Screenshot-2017-11-19 Xender Web(2)

IMG_5489B
Your Firefox window now shows you the contents of your iOS device, organized into Images, Videos, Music, and Documents. You can download (transfer) individual or multiple files.

Screenshot-2017-11-19 Xender Web(1)

Xender isn’t perfect for me, but it’s easy enough, fast, and free. I wish I could set up a location where the files end up on my laptop, rather than just “downloads.” No big deal. For batches of files, Xender creates a zip file for the transfer. Again, not a problem for me. It has features I haven’t explored, too, and it allows transfer between iOS, Windows, Mac, and Android.

At first I tried to avoid the QR code step because I thought it would be cumbersome. But the alternate approach requires typing in the iOS device’s local IP address (or at least verifying it) each time. The QR code scan is actually faster, and once you’ve done it once or twice it’s amazingly quick and much easier than thinking about IP addresses.

I plan to try using it once a day for a couple weeks, then I’ll update this post. Interested to hear about other teachers’ solutions, too.

Introduction to Block Based Programming With Scratch – PSA Super Conference

Presenter 1:
Elaan Bauder  – twitter: @elaan
Teacher – Technology Explorations
École Kwayhquitlum Middle School
School District 43 Coquitlam

Presenter 2:
Rick Botero  – twitter: @rbotero
Teacher – Grade 3 / Digital Literacy K-5
Eagle Ridge Elementary School
School District 43 Coquitlam

Session Title: Introduction to Block Based Programming with Scratch
Target Audience: Intermediate (e.g. 4-7)
Program Strand: Instructional/Assessment Approaches and Techniques

Finalized Session Description:

Come to this session to learn how easy it can be to introduce your students to programming! We will show you the kinds of activities we have done with Scratch at the elementary and middle level. It’s engaging, and students love it! Scratch is a block based programming language. It is designed to be accessible for children and enjoyable for anyone. The user programs the behaviors of objects on a stage, using rules that are based on conditions and actions.

Participants are required to bring their own Windows or Mac Laptop. Sorry no tablets as there is no iOS or Android app.
We will use WiFi to access the online (browser) version of Scratch during the session.
We recommend that ahead of time you also download the “Scratch 2 Offline Editor” at:
https://scratch.mit.edu/scratch2download/
This will provide an alternate tool for the session, that does not rely on WiFi/Internet.

PDF:
today’s presentation slides
scratch-fish-chomp-stepbystep-gr4-5
scratch-fish-chomp-extensions-gr4-5
fish-chomp-checklist

Word:
scratch-fish-chomp-stepbystep-gr4-5
scratch-fish-chomp-extensions-gr4-5
fish-chomp-checklist

Scratch Online:
Fish Chomp By MrBotero

Keeping Your K-5 Child Safe Online

2551630702_765aaf5e76
Recently I’ve been thinking a lot about how to encourage parents of our K-5 school’s families to help develop appropriate and safe out-of-school online habits at an early age. After some research and collaboration involving students, teachers, our counselor, and my dear friend Carol Todd, I created a letter we are emailing home to our school community. I decided to go with clear recommendations for parents. While they reflect my personal opinions in some areas, I’m confident the advice supports the values and goals of our school. I’m sharing here in hopes that other educators and parents might find some of it useful.


2017-04-25 PIC1 - Online Safety Notice Eagle Ridge2017-04-25 PIC2 - Online Safety Notice Eagle Ridge
Here are clickable links for parent resources. I’ve included a few that are not listed in the parent letter.

School District 43 (Coquitlam):
https://www.sd43.bc.ca/Resources/DigitalCitizenship/Pages/ParentResources.aspx

Media Smarts:
http://mediasmarts.ca/parents

Common Sense Media:
https://www.commonsensemedia.org/parent-concerns

UK Safer Internet:
https://www.saferinternet.org.uk/advice-centre/parents-and-carers

Kids In The Know:
https://www.kidsintheknow.ca/app/en/parents-educational_tools

Cyberwise.org:
http://www.cyberwise.org

Sue Scheff blog (Parent Advocate):
http://suescheff.com

Kids Help Phone:
http://www.kidshelpphone.ca/Kids/Home.aspx

Telus Wise (In Control):
https://wise.telus.com/incontrol/

Need Help Now:
https://needhelpnow.ca/app/en/

Cybertip.ca:
https://www.cybertip.ca/app/en/


Photo credit: KIDSAFE | paul.klintworth | Flickr (


K-5 Coding Resources

I’ve just spent some time organizing some great resources for coding & computational thinking. Thought I’d share.

10ReasonsToTeachCoding

For Students:
Blockly – Coding Games
Code Monster – Crunchzilla
Computer programming – Khan Academy
Hour of Code
Microsoft Touch Develop – Tutorials
Kodu Racing Games – youtube tutorial
Scratch Tutorials
Tynker – Free

For Teachers / Parents:Hour of Code Suggestions by Grade Level – askatechteacherK-3 Coding Resources – Karen LirenmanCodeBC – Teacher Coding ResourcesLearn to Code – Brian Aspinall15+ Ways of Teaching Every Student to Code (Even Without a Computer) | EdutopiaHour of Code – code.org Kodu Racing Games 1 – youtube tutorialScratch Tutorials – scratch.mit.edu

image source: http://brianaspinall.com/10-reasons-to-teach-coding-sketchnote-by-sylviaduckworth/

Introduction to Block Based Programming With Scratch

See the attached resource materials for my Pro-D presentation on February 24, 2017 with Elaan Bauder.

Presentation description:

Rick Botero teaches at Eagle Ridge Elementary and is part of the District Educational Technology Advisory Committee. Elaan Bauder teaches at Kwayhquitlum Middle and is part of the SD43 Technology Support Team. Elaan and Rick are executives for SD43’s CUE43 Technology LSA.
Come to this session to learn how easy it can be to introduce your students to programming! We will show you the kinds of activities we have done with Scratch at the elementary and middle level. It’s engaging, and students love it! Scratch is a block based programming language. It is designed to be accessible for children and enjoyable for anyone. The user programs the behaviors of objects on a stage, using rules that are based on conditions and actions. Sponsored by CUE43 and District Technology Support Teachers.

PDF:
today’s presentation slides
scratch-fish-chomp-stepbystep-gr4-5
scratch-fish-chomp-extensions-gr4-5
fish-chomp-checklist

Word:
scratch-fish-chomp-stepbystep-gr4-5
scratch-fish-chomp-extensions-gr4-5
fish-chomp-checklist

Scratch Online:
Fish Chomp By MrBotero

Spheros in Grade One at Eagle Ridge

A guest post by my colleague Erin Vakenti:

Yesterday my class wrapped up our unit on coding using Sphero Sprks.  I began using Spheros with my Grade One class in January.  On our first day we jumped in with both feet – we spent the entire day experimenting with coding for the very first time.  To say the kids were engaged would be a huge understatement; they were so excited they didn’t even notice when we missed our P.E. block.

That first day we focused on the basics of how to begin a program and how to make the Sphero move.  We opted for a simple goal of rolling away and rolling back.  We experimented with roll times and speeds to come to a consensus of what values would work best in our environment.

div13-02

Each week we revisited the Spheros for a least one full afternoon.  Over several weeks, we collaborated to learn how to create shapes with the Spheros and how to maneuver through mazes the kids created.  We also aimed to enhance our rolls with spins, changes in colour and sound displays.

I think it’s fair to say, that my class considers their opportunity to work with the Spheros a highlight for the year.  After the introductory session, the kids asked me every day when it would be our turn again to use the Spheros.  Every single student was excited and engaged with each new Sphero experience.

Parents were also impressed with our Sphero experimentation.  They had the opportunity to see their child’s coding skills in action through videos sent home via the Fresh Grade parent communication app.  Some parents were so taken with the Spheros that they even purchased one for their own child to use at home.

As a teacher of young children, I was very impressed with Sphero’s user-friendly coding system.  The drag and drop system involves very little reading making it accessible to all the students in my class.  I was also impressed with the very rich dialogue between the students that developed as they worked in pairs and small groups to write their programs.  This showcased our class’ work on the Core Competences of Communication, Critical Thinking and Social Responsibility.

I hope that we are given the opportunity to work with Spheros again in the near future.   It was a pleasure to join their kids in their explorations.

Erin Vakenti
Grade One Teacher
Eagle Ridge Elementary School

Spheros K-5 at Eagle Ridge

On November 2, 2016 our school received a Sphero+iPad Mini 12 pack from CUEBC, our British Columbia technology using educators specialist association. With great excitement I unpacked the new equipment and began to imagine how I could use it to engage our K-5 students in computational thinking activities, in fun, engaging and challenging ways. A few logistics to sort out, but I was eager to get started.

Context

  • 16 divisions from Kindergarten to grade 5, some single-grade classes and others blended classes
  • A digital literacy specialist (myself) teaching most classes once a week in a computer lab, typically 40 to 50 minute periods, half-week assignment. I teach in a grade 3 class share the other half of the week. I have a BSc Computer Science degree plus 11 years in the IT industry before my teaching career – coding and computational thinking are within my comfort zone 🙂
  • Most classes had previous years’ exposure to The Hour Of Code and various other computational thinking activities, both with the digital literacy specialist and classroom teachers
  • Grade 4 and 5 students have for a few years completed a coding unit in the spring, alternating between Scratch and Kodu as the tool
  • A wide range of expertise and comfort level among staff, regarding computational thinking activities (including coding)

Set Up

One of my main goals was to maximize the amount of time during the week the spheros were in use by students. I took the following set up steps before releasing the spheros to classes / teachers. It took me about a week to get it ready:

  • Decided on a fixed sphero charging location vs mobile cart. Chose a lockable cupboard, did a test for a few hours with a thermometer, to make sure the cupboard wouldn’t get too hot.
  • Decided on a fixed iPad charging location, for security reasons. Chose a well ventilated closet with power source already in place. Used some trays I had from previous iPad packaging, to be able to stand up all the iPads while charging.
  • Labeled the iPads 1-12, so students could easily find the iPad where they may have a saved program.
  • Separated the iPad storage location into two trays, for “Set A (1-6)” and “Set B (7-12).” My idea was that teachers may want to book and use only 6 at a time.
  • Purchased and made available two smaller iPad transport bins, and stored them near the iPads, for teachers to transport to classes. I felt that the CUEBC bin was too big and heavy to lug around.
  • Purchased two smaller sphero transport trays, to get them from the charge cradles to the classroom or lesson location. I spent some time creating padding and separators for these clear sphero trays. The trays were stored near the charge cradles, ready for teachers to grab.
  • In our online “Technology Booking” screen, I created an option to book Sphero Set A, Sphero Set B, or Sphero Sets A+B. I reserved the spheros for myself for all my digital literacy teaching time (half the week). I created a Sign Out/Sign In form (paper), for teachers to sign as they removed and replaced the spheros at the chargers.
  • Invited all teachers / administrator to attend a “sphero introduction,” to be delivered by grade 4/5 students two weeks later. Time to get busy getting these student helpers ready!

img_3010 img_3062img_3061 img_3063 img_3065 img_3070sphero_booking

Read More »

Correcting my password chaos

I admit it – for many years I’ve been lazy and reckless with my online passwords. I don’t think I’m alone. But I have changed my ways. I am starting to use password manager software to take better control of my online accounts access.

Like many people I know, I had a scheme for assigning variations on the same password when creating an account at a site. Afterward when I went to login, I’d just try my typical username and password, and if that didn’t work I’d try my 2nd password variation, and so on. I thought I was pretty organized by having all my sites with “accounts” in a separate browser bookmark list, with little hints for how to signon, right in the bookmark list. By this summer, my bookmark list of sites with online accounts was about 50 deep.

I have no excuse. I was aware this password and organization scheme was not good online security practice. A security breach at any one of the websites I sign on to could result in malicious access to a large number of my online accounts, potentially causing me digital chaos both at work and at home. Also, it was becoming difficult to lookup account information from different devices – iphone, ipad, laptops and desktops at work and home. And what if my laptop with my sites/hints list was stolen? The problem just seemed too daunting to fix. But with a few free days this summer I finally made the leap and committed that I would:

1. find all my online accounts

2. assign a unique, secure password to each online account (check out some password creation tips here)

3. organize the login information in a secure, easily retrievable way

Password managers

Half a day’s research (including my trusty pln) led me to realize that I probably needed to use password management software. I looked into a number of software titles including 1Password, Lastpass, mSecure, Kaspersky, and Roboform to name a few. I learned that one of the main things to decide is whether you want to store your password information locally or in someone’s cloud. Of course there are pros and cons for both: cloud based allows for easier access across devices, while local storage may provide better personal control over password data. Then if you choose cloud based password storage, you have to decide if you want your data kept with a generic service like dropbox, or on a Password Manager company’s site.

I ended up choosing Lastpass over 1Password, for the following reasons:

  • Web based in-house password storage for easy access anytime, anywhere
  • Support across many platforms, specifically for me Windows, Mac, iOS and Android
  • Rich feature set and positive reviews from both professional critics and everyday users
  • Cost – Lastpass is free for desktops/laptops, $12 yearly for “Premium” upgrade to include iOS and Android. 1Password would have been around $70.
  • Proven record. They’ve been around since 2008 and are well established.

The result

LastPass Vault

It took 3 full tedious days to find and organize all my online accounts using Lastpass. I also used each site’s “change password” area to assign a unique and fully secure password. I now have all my account information fully centralized and accessable from any device, and in Windows from Firefox, Chrome or Explorer. When I go to a site I have to sign on to, I sign onto Lastpass with my master password, and all my login information for the site is filled in for me. After extensive searching through my digital life, I have exactly 100 passwords in my master list, and they are all unique, secure, and impossible to guess. And I don’t know any of them off the top of my head (except a couple key ones).

It’s not perfect

This will be a journey. I’m relieved that all my accounts now have unique, unguessable passwords. But I’m totally dependent on my password manager to find my passwords for me, or allow me to look them up. This could be a challenge, especially at work where I often need quick access to account information when teaching. It will be interesting to see if the software is “manageable” or will frustrate me excessively. That is my biggest fear – not knowing my passwords for instant access. But I’m ready to let that go. I’ve also let go of the worries over web based password storage by a private company. Honestly, I think they will do a better job of keeping it secure than I’ve managed.

I’ll let you know how it goes !

Win7 64-bit at Eagle Ridge

This coming week our school’s teacher laptops will be upgraded from Windows 7 32-bit to Windows 7 64-bit. We’re doing this in order to take advantage of our recent laptop memory upgrades from 2GB to 4GB. Sadly, 32-bit Windows can address a total of 4GB memory, but some of that is reserved for Video devices and other stuff. So you’re left with about 3.1 GB usable memory.

Thank you to our new Manager of Information Technology and our school technician for helping us move to 64-bit Windows. So far we’ve installed it on 2 teacher laptops and our new library desktop, and have been using it for two weeks. So far so good – no problems to report. Just a few items to tweak on the image that will be used for the other 20 teacher laptops, and I think the image is ready to go.

I have hosted one workshop for teachers on “how to backup and restore your files” before the laptops get wiped clean. Another workshop Monday, the re-imaging begins on Tuesday, then I will offer help again to restore personal files after the laptops are ready.

Thought I would share the notes I made for teachers on how to backup and restore personal files … documents, pictures, video, music, iTunes… See attachment!  Backup Laptop and Restore

Things I’m liking …

“Speed Geeking” presentation at SD43 Pro-D Day, Feb 22, 2013

Cursive writing – technology supports for a self-paced program

student practice booklets – based on “Clock climbers” program
iPad apps – “Cursive Practice” and “Fun Letters Cursive Handwriting”, for students to learn and practise
cursive 2 cursive 3
Smartboard screens to match student booklet, with animations, for students to learn and practise (EFI Fontware for cursive fonts)

cursive 1

Jeopardy

Using freeware “Stu’s Quiz Boxes”   http://quizboxes.com/
Question
Editor to set up questions
Pictures – save in prescribed size, name, format
Sounds – save in prescribed size, name, format
Set up special questions: double-value, risk-an-amount
Tracks team scores as you go, up to 6 teams
jeopardy1 jeopardy2

Sumdog

www.sumdog.com
Math practice games, students play against class, world, or computer
Teacher setup of classes, teachers, students, and skill level for groups or specific students
Teacher can set up Activities – restricts students to specific skills and levels
Bulk load and edit of student accounts
sumdog1 sumdog2

Sharepoint – explorer view

In sharepoint go to your list : eg View All Site Content  /  Site Documents
Actions   /  Open with Windows Explorer  /
Drag Address Bar icon to desktop
You now have a folder on your desktop you can modify, without using Sharepoint
sharepoint_explorer1 sharepoint_explorer2

Sharepoint – auto-changing webpart

A date-sensitive website part that rotates content based on date
Examples: spelling list for each week, math problem of the week, rotating student work ….
Set up once for whole year
Instructions (warning – these are old! but you’ll get the idea) Auto changing spelling list
sharepoint_spelling

Storybird

www.storybird.com
Create stories with an art gallery as starting point
Bulk load and edit of student accounts
Free for one class, subscription for more,
Social sharing of stories and comments
storybird1 storybird2

OneNote — Evernote

Both good information storing tools
http://www.evernote.com – cloud based, seasoned tool, friendly interface, lots of hooks to other tools, many many platforms
Microsoft Office / Microsoft OneNote 2010 – cloud based or local, great Office integration
evernote onenote